Onsite groundwater sampling procedure
Preparing for onsite operations
Before going onsite, it is essential to obtain the necessary equipment, either through sale or rental. Ensure that the equipment is calibrated and have extra batteries on hand. Refer to the checklist to ensure that all required items are available. During equipment setup, refer to visual examples.
Peristaltic pump example
Before starting:
- Re-check instruments are operational. NB: Refer to instrument manual for calibration schedule & troubleshooting in manuals
- Label the containers with waterproof pen – Job #, Sample ID, Date, Initials of Sample Collector
- Put on and adjust PPE including nitrile gloves before collecting laboratory sample/s prior to conducting in-situ physico/chemical testing
On Site Set Up
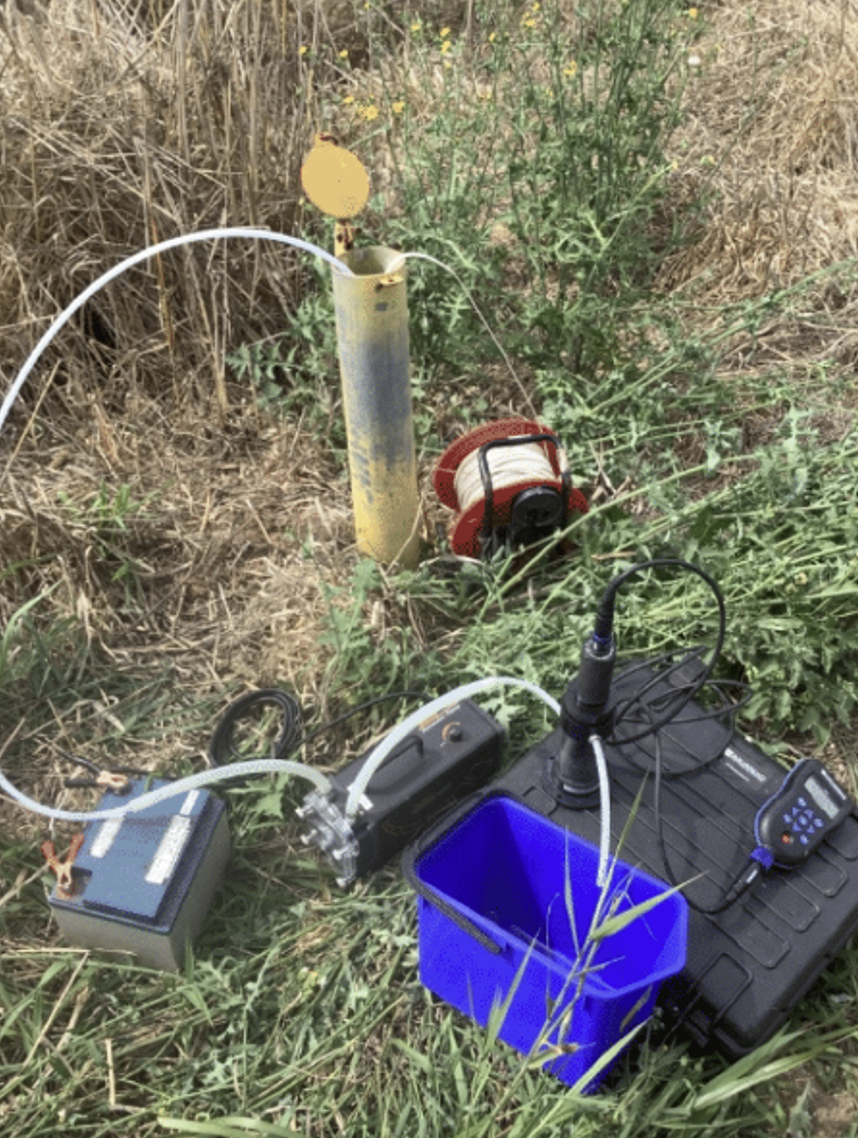
Location – Ensure you are sampling the correct bore as sometimes there can be multiple bores located in close proximity. If possible, park the field vehicle next to the bore and ensure operating surfaces are level. If you cannot drive the vehicle up to the bore (eg. too muddy, fences, bush), carry the sampling gear required to the bore.
Cleanliness – Ensure that the sampling area is as clean as possible. If necessary, place a drop sheet of plastic next to the well to ensure equipment is kept clean. Decontaminate all reusable equipment following the procedure outlined below. When the sampling suites required involves PFAS, the detergent solution must be PFAS free.
Review – Review work instructions and safety procedures
Record – Take photos of the site that you are sampling. Best practice includes any photos relevant to the sample site (e.g. outlet pipes, nearby roads, overhanging vegetation, woody debris in water etc.). Record any observations such as evident disturbance by fauna, level of degradation or erosion, any strong odours, any obvious oily films or discolorations). This will be prompted by the inclusion of photograph sections in the HydroTerra Electronic Field Forms; (do we provide these forms as part of the course?)
Method – General Field observations and results from groundwater gauging will be used to determine the appropriate sampling method in consultation with a senior hydrogeologist and the project manager. In the case that it is required to identify the presence of light non-aqueous phase liquid (LNAPL), an interface meter will be required. For Low Flow sampling, ensure the pump has been decontaminated and that a fresh bladder has been installed within the pump intake. Using bore construction details select a pump intake depth which is within the screened section of the bore.
‘Groundwater sampling steps: Low Flow Sampling with bladder pump’ guide is available In Appendix A.
Onsite Equipment Setup
Connect the equipment, following the intuitive process of connecting hoses. Calculate the required psi (pressure) based on the depth of the pump using a formula that accounts for the conversion of feet to meters. This step requires experience to set the controller pressure adequately. Adjustments may be necessary on-site to regulate flow rate, so it is crucial to understand how to perform this task.
Step 1: Measurements
Remove well cap and measure the height the bore pipe protrudes oout of the ground, or how much lower it is bellow ground level. You can use your water level meter/interface meter to do this and the following measurements. Next, measure the standing water level of the bore by placing the end into the bore and lowering it down until beeping is heard. Lastly, measure the total depth of the bore.
<div style=”padding:56.25% 0 0 0;position:relative;”><iframe src=”https://player.vimeo.com/video/855239149?badge=0&autopause=0&player_id=0&app_id=58479″ frameborder=”0″ allow=”autoplay; fullscreen; picture-in-picture” style=”position:absolute;top:0;left:0;width:100%;height:100%;” title=”Water Level Measurement (Copy)”></iframe></div><script src=”https://player.vimeo.com/api/player.js”></script>
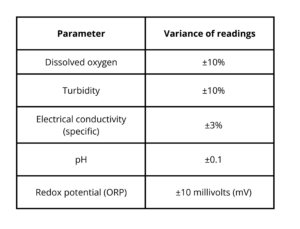
Step 2: Purging/Pumping
Follow the standard operating procedure (SOP) or instructions provided by the EPA for purging/pumping groundwater. Measure water quality parameters and wait until the water stabilizes, indicating the presence of fresh water from the aquifer, before proceeding with sampling. The water is considered to be stabilised when three consecutive readings are within the following:
Step 3: Sampling
Sampling should adhere to the SOP and instructions provided by the EPA. Consider including duplicates, triplicates, field blanks, rinsate blanks, and using filters (e.g., inline) as necessary.
Sampling definitions
- Duplicate sample: Samples taken in immediate succession and subjected to the same filtering, preservation, holding and analysis methods. Duplicates are taken as a check for precision of sample analysis.
- Triplicate sample:
- Field blank: Used to monitor contamination during sampling. These blanks are deionised water poured into sampling containers under field conditions during sampling and should include any filtration or addition of preservatives as appropriate.
- Rinsate blank: Generally taken from the final rinse of equipment after decontamination, or prior to the use of disposable sampling equipment and involve collecting deionised water that is poured over the equipment. These samples provide information ensuring that there is no cross-contamination of samples from the sampling equipment.
- Trip blanks: Used to monitor potential cross-contamination during transport and storage. Trip blanks are clean samples of deionised water which are sent from the laboratory with empty containers and remain with the other samples throughout sampling without being exposed to the sampling procedures.
Once you are all set up and ready to sample here’s what you do:
- Get the sample bottles and filters (if required) ready and ensure they are labelled correctly. Take care not touch or contaminate inside the lid and container.
- Detach sampling tubing from flow cell and allow discharge to flow directly from sampling tubing into sample container. Ensure that flow rate during the sampling is equal to or less than the flow rate during pumping.
- Fill appropriate sample containers provided by laboratory. Take care to ensure that any containers that have a preservative in them are not flushed out or overfilled. For samples that require filtering, allow groundwater to discharge directly into the appropriate disposable filter unit and out into the sample containers.
- Place all labelled sample bottles securely into a chilled esky. Take care to avoid damaging the glass vials when storing and transporting the samples.
- Take time to ensure you have filled all the sample bottles the lab requires and any duplicate or other samples required.
- Upon completion of sampling, remove equipment from the bore.
- Take a final water level reading using dip tape and record.
- Pack up site and equipment, leaving nothing behind.
- Record the results in a Bore Information and Field Analyses Sheet (refer Appendix C)
Step 4: Post Sample Collection/Clean Up
After sample collection, it is crucial to clean the equipment that gets reused at each bore (water quality meter, water level meter, tagline etc.) thoroughly to prevent cross-contamination. The correct procedure to decontaminate the equipment is:
- Rinse the equipment in tap water;
- Clean with appropriate decontaminating detergent solution;
- Rinse equipment with tap water;
- Rinse three times with demineralised water;
- Allow to dry.
Step 5: Chain of Custody (COC)
The chain of custody is the beginning of traceability for the samples. Ensure that proper record-keeping integrity is maintained, including signatures on the chain of custody form. Safely transport the samples to the lab, adhering to the specific conditions required (to be communicated by the lab).